Common Scan Mistakes in Laser Scanning (and How to Prevent Them)
Avoid costly laser scanning errors: weak control, poor overlap, missed voids, bad registration, and unclear specs. Practical fixes for Scan to BIM success.
BimzstudioMar 30, 202613 min
laser scanningscan mistakespoint cloudScan to BIMregistrationQA/QC
Common Scan Mistakes: The Field Errors That Ruin Otherwise Good BIM Projects
Laser scanning can be extraordinarily accurate—and still produce a dataset that fails a renovation. The difference is rarely the brochure precision of the instrument. It is the accumulation of common scan mistakes: missing control, optimistic overlap, rushed occupied-site capture, undocumented voids, and handing “a cloud” to modelers with no acceptance criteria.
This guide catalogs the mistakes experienced BIM engineers see repeatedly, explains why they happen, shows EU/U.S. context, and gives prevention steps you can put into a scan plan and BEP tomorrow.
Missed stations and weak overlap are still the most expensive mistakes.
Scanning sits at the front of the existing-conditions pipeline. Errors introduced here propagate into registration, modeling, coordination, fabrication, and installation. Because point clouds look dense and convincing, stakeholders often assume the hard work is done when the site visit ends.
In practice, the expensive failures look like this:
Prefabricated corridor racks collide with an uncaptured pipe cluster
A stair volume is wrong because setups never saw the underside clearly
Two wings do not align because campaigns were merged casually
Façade mullions are guessed where glass dropouts dominated
The BIM team spends days cleaning what should have been prevented in the field
Common scan mistakes are mostly process mistakes. They are preventable with planning, QA/QC discipline, and honest scoping around LOD and access.
Why It Happens
Plan targets, control, and exclusion zones before the first setup.
Access windows dominate decisions
If a plant only grants six hours, teams unconsciously trade quality for coverage. Without a pre-agreed minimum viable capture list, everything becomes “best effort.”
Skills vary widely
Owning a scanner is not the same as running a survey-grade capture program. Architecture visualization workflows differ from engineering as-built workflows.
Specifications are vague
“Scan the building” is not a specification. Missing details include density, control, coordinate system, exclusions, deliverables, and accuracy zones.
Temporary conditions are ignored
Parked vehicles, stacked materials, open doors that will later close, and crowded events create occlusions that look permanent in the cloud.
Success is measured by days on site, not accepted data
Vendors paid only for mobilization have little incentive to document voids or return for critical gaps.
Industry Examples (EU / USA)
European examples
Historic city assets: Limited street closures and fragile interiors push teams to under-scan roofs and courtyards.
Industrial shutdowns: Scanning during outages fails when teams chase “full coverage” instead of outage-critical tie-ins first.
Cross-border project teams: CRS and unit misunderstandings appear when files move between national offices.
United States examples
Hospital night work: Fatigue and security escorts lead to skipped utility closets.
Active retail renovations: Store fixtures block walls; teams forget to note temporary merchandise as transient.
Campus tunnels and basements: Long linear assets accumulate drift when control is sparse.
Airport secure areas: Badge logistics consume time; residual minutes are spent scanning the easy concourse instead of the hard back-of-house.
The pattern is universal: constrained sites punish weak plans.
Technical Explanation
Mistake categories mapped to technical effects
Mistake
Technical effect
Downstream BIM impact
No/poor control
Absolute mislocation
Site/model misfit
Insufficient overlap
Weak registration
Ghost surfaces
Too few setups
Occlusions
Guessed geometry
Ignoring reflectivity
Dropouts/noise
Wrong sizes
Mixed campaigns, no re-check
Local shear
Coordination errors
No void documentation
Unknown unknowns
Late RFIs
Wrong density settings
Soft features
Bad small-element modeling
Unclear CRS/units
Scale/location errors
Everything downstream fails
Control mistakes
Common failures:
Resectioning from unstable temporary points
No check points
Control too sparse for long buildings
Elevations assumed from architectural drawings
Overlap and geometry network mistakes
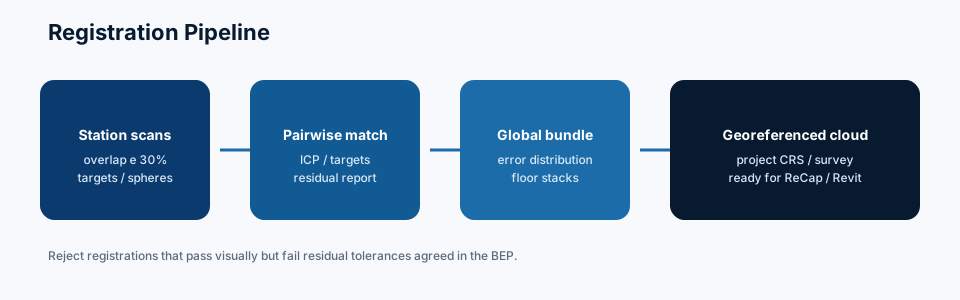
Registration needs geometric continuity. Long glass corridors, repetitive parking garages, and atriums with limited unique features need planned targets or denser setups.
Environmental mistakes
Scanning through heavy rain/dust without mitigation
High vibration near operating equipment
Extreme lighting assumptions for hybrid photo workflows
People traffic creating “phantom walls” of moving points
Scope mistakes
Scanning for marketing walkthroughs and later forcing engineering LOD from the same dataset is a category error. Fitness for purpose must be designed up front.
Best Practices
Catch mistakes in registration reports — not after modeling week three.
Write a scan plan tied to decisions and LOD zones.
Prioritize critical rooms if time collapses.
Establish control before production scanning.
Use targets strategically in low-feature spaces.
Log exclusions the same day with photos.
Plan revisits in the fee.
Separate transient clutter from permanent assets in notes.
Run overnight registration QA on multi-day jobs.
Confirm CRS/units with the BIM lead before delivery.
Gate Scan to BIM modeling on accepted clouds.
Step-by-Step Solution
Step 1: Convert project risks into capture requirements
List tie-in rooms, shafts, roofs, tunnels, and façade interfaces. Assign tolerances.
Step 2: Build the setup strategy
Estimate setups from plan geometry, not from wishful thinking. Include overlap and contingency.
Step 3: Control network design
Match control density to building length/height and required absolute accuracy.
Step 4: Field execution protocol
Standardize naming, setup photos, daily issue logs, and weather/access notes.
Step 5: Same-week registration and gap analysis
Do not wait until demobilization to discover the east wing does not close.
Step 6: Client void review
Decide re-scan/accept/exclude with design stakeholders.
Step 7: Package for modeling
Deliver clean structure, reports, and known-issues register.
Step 8: Model with confidence tags
Measured vs inferred remains visible in the BIM process.
Environment-Specific Mistake Patterns
Not every building fails the same way. Tailor prevention to asset type.
Healthcare
Night shifts, infection-control limits, and locked utility closets create systematic under-capture of the rooms that matter most. Mitigation: prioritized closet/shaft lists, clinical liaison support, and mandatory void reporting before design freeze on interventional departments.
Airports and transit
Security badging consumes the clock. Teams then scan concourses (easy) and under-scan bag belt levels and mechanical penthouses (hard). Mitigation: badge logistics planned weeks ahead; capture sequenced by risk, not convenience.
Industrial plants
Operating lines, steam, vibration, and stainless reflectivity combine with dense piping occlusions. Mitigation: static densification in tie-in zones, planned outages for critical pockets, and honest exclusion logs when safety forbids access.
Historic buildings
Fragile finishes, tourist traffic, and complex vaults encourage rushed interiors and forgotten roofs. Mitigation: conservation-approved access plans, hybrid photogrammetry where needed, and selective high-density only at intervention interfaces.
Commercial office TI
Furniture and partitions create fake wall thicknesses. Mitigation: scan after strip-out where possible, or annotate temporary objects aggressively and avoid modeling furniture shadows as architecture.
Cost of Mistakes vs Cost of Prevention
A useful conversation with clients:
Prevention item
Typical relative cost
Failure mode it avoids
Extra half-day for critical rooms
Low
Guessed MEP geometry
Proper control network
Low–moderate
Wing misalignment
Same-week registration QA
Low
Discovering shear after demobilization
Documented void report
Very low
Silent unknowns at design freeze
Contracted re-scan allowance
Moderate
Schedule fights later
Full remodeling after bad cloud
Very high
Everything
Most “scanning is expensive” complaints are actually “rework is expensive” complaints caused by under-planning.
What Modelers Wish Scanners Knew
Above-ceiling visibility beats another pretty lobby scan.
Shaft continuity across floors is gold.
Setup photos save hours of “what is this blob?” investigation.
Naming consistency across campaigns matters for registration forensics.
Please do not delete temporary clutter points before modelers see occlusion reality—unless you also provide photos proving what was temporary.
Invite modelers into planning and you will prevent an entire class of common scan mistakes before the tripod hits the floor.
Registration Mistakes That Look Like Modeling Mistakes
A large share of “bad BIM” tickets are actually registration defects discovered too late.
Ghost walls
Double surfaces in the cloud force modelers to pick a side. If they pick inconsistently across rooms, doors and corridors drift. Prevention: visual stripe QA and local cloud-to-cloud checks before modeling authorization.
Floor warp
Slight registration tilt makes slabs appear warped. Modelers then “correct” floors to level, destroying real settlement information needed for renovation detailing. Prevention: check point elevation verification and stacked-floor reviews.
Campaign seams
Monday’s west wing and Thursday’s east wing meet with a shear at the expansion joint. Prevention: shared control, overlap belts between campaigns, and mandatory seam inspection.
Over-cleaned seams
Aggressive outlier removal can erase the evidence of misregistration, leaving a falsely smooth cloud. Prevention: keep pre-clean archives and review difference maps.
When Scan to BIM teams insist on accepted clouds, these defects become survey corrections instead of silent modeling assumptions.
Checklist: Pre-Demobilization Gate
Before leaving site (or ending a multi-day campaign), confirm:
Critical room list 100% visited or explicitly deferred
Control residuals reviewed
Overnight/same-day registration spot checks done
Void photos filed with room IDs
Reflective problem areas noted
Client informed of likely re-scan candidates
CRS/units confirmed with BIM lead
Demobilizing without this gate is one of the most expensive common scan mistakes in the industry.
Training and Crew Continuity
Many scan mistakes are people problems:
Day-one crew understands the critical room list; day-three substitute crew does not
Different operators use different density settings without logging why
Night-shift fatigue leads to skipped closets
Language barriers on multinational sites cause incomplete void notes
Mitigations:
One page field brief in the crew language(s)
Mandatory handoff notes between shifts
Spot audits by the scan lead on every campaign longer than two days
Photo proof for every critical room
No demobilization sign-off without lead review
Instrument skill certificates do not replace project-specific briefings.
Clients sometimes ask whether better hardware would have prevented a failed campaign. Honest answer: occasionally. Far more often, a mid-tier scanner with a disciplined plan, control network, void log, and modeling gate outperforms a premium instrument operated as a “walk around and capture everything” exercise. Process quality is the scanner feature that never appears on a brochure—and it is the one that decides Scan to BIM success.
Case Study
Project: U.S. mixed-use podium renovation What went wrong initially:
Interior scans completed over two weekends by different crews
Minimal shared control
Retail fixtures treated as permanent in notes (because there were no notes)
Modeling started Monday after the second weekend
Consequences:
Podium levels disagreed near expansion joints
Several back-of-house corridors had fake “thickness” from fixture occlusions
Clash detection against new utilities produced noise
Recovery:
Stopped modeling on disputed floors
Added control and a targeted re-scan of joints and BOH corridors after fixture clearing
Re-registered and issued a QA package
Restarted Scan to BIM with zone acceptance
Lesson: The scanner was never the villain. The missing plan, control, and QA gates were.
Common Mistakes
Scanning without a written purpose and LOD matrix
Skipping survey control on “small” buildings that are still long and complex
Underestimating glass, black finishes, and stainless reflections
Too few setups in cluttered MEP rooms
No photos accompanying setups
Merging old and new campaigns casually
Delivering raw unregistered dumps to BIM teams
Calling mobile reconnaissance a substitute for static accuracy everywhere
Forgetting exteriors/roofs until design needs parapet ties
No contractual re-scan mechanism
Measuring success by gigabytes delivered
Ignoring vertical circulation and shaft continuity
Each of these is cheaper to prevent than to repair.
Expert Tips
Carry a “cannot leave without” room list in your pocket on constrained sites.
If a room is 70% occluded, say so immediately—do not hope modeling will invent clarity.
Use quick local registrations nightly on multi-day campaigns.
Teach clients what temporary objects do to clouds using one visual example.
Align scanner settings to element size you must resolve, not to maximum bravado density.
For façades, plan alternative geometry (angles, targets, night sessions) where glass dominates.
Put CRS confirmation in writing with a sample coordinate pair.
Invite the modeler to the pre-scan meeting. They will ask for the setups surveyors forget.
Future Trends
Automated scan-plan assistants proposing setups from BIM/floor plans
On-device completeness indicators warning of weak coverage before leaving a room
Hybrid mobile/static workflows with clearer QA standards for fusion
Contract models that pay for accepted coverage, not only crew days
Tighter coupling of scan mistakes databases into company QA systems
Technology will reduce some errors; process culture will still decide outcomes.
FAQ
1. What is the most common scan mistake on renovation projects?
Insufficient documentation of voids and occlusions, closely followed by weak control/registration discipline.
2. Can software fix poor field capture?
Only partly. Software can register and clean, but it cannot invent true surfaces behind occlusions or create control that was never measured.
3. How many setups do I need?
Enough to see required surfaces with planned overlap—driven by geometry and clutter, not a universal number. MEP rooms need denser setups than open offices.
4. Are targets always required?
No, but low-feature or high-risk spaces often benefit from them. Decide in the scan plan.
5. Is one scanner brand less prone to mistakes?
Process mistakes dominate brand differences. Fit-for-purpose instrument choice matters, but planning matters more.
6. Should we scan during occupancy?
Often yes, but occupancy increases occlusion and motion artifacts. Plan timing, communication, and possible revisits.
7. How do common scan mistakes affect LOD?
They force more inferred geometry. High LOD claims become indefensible without complete, accurate clouds in those zones.
8. What should be in a scan mistake prevention checklist?
Common scan mistakes are predictable: weak purpose definition, poor control, optimistic coverage, ignored site realities, and missing QA gates. They turn capable scanners into unreliable inputs for Scan to BIM. EU and U.S. constrained sites amplify these errors, but a decision-driven scan plan, documented voids, registration QA, and acceptance criteria before modeling can prevent most of them.
Stop measuring scanning success by how much data was captured. Measure it by whether the accepted cloud can support the LOD and coordination decisions you still have to make.
Reduce Scan Risk with Bimzstudio
Bimzstudio helps project teams convert laser scans into trustworthy BIM—starting with fit-for-purpose capture expectations, point cloud QA/QC, and LOD-aligned Scan to BIM modeling for EU and U.S. renovations. If you already have a cloud, we can stress-test it before modeling. If you are planning a scan, we can help define the requirements that prevent the usual field failures.
Share your site constraints and model goals, and we will outline a practical capture-to-BIM path with clear QA checkpoints.